
TL;DR: If you’re looking for just the code, you can jump straight to it here.
I’ve been winding down 2015 by focusing on learning new subjects and improving my existing skills. Most of December was occupied with writing my first-ever app and I’ve been using Xamarin.Forms to create my UI. For those of you who are unfamiliar with it, Xamarin.Forms is a cross-platform toolkit for creating native user interfaces for iOS, Andriod, and Windows Phone apps. The native part is important here; simply put, I can code one UI, and Xamarin.Forms will do the heavy lifting for me, mapping my control as the equivalent control on each platform. If you are interested in how Xamarin.Forms works, I highly suggest reading the documentation, including Charles Petzold’s new book ‘Creating Mobile Apps with Xamarin.Forms‘.
One extremely useful feature of Xamarin.Forms is Custom Renderers. If there is something the toolkit doesn’t provide, or if you want to change a default appearance or behavior, you can create a custom renderer and voilà, your needs have been met!
While writing my app one problem I had was creating a lefthand bar button for a modal page on iOS, which is not possible by default in Xamarin.Forms.
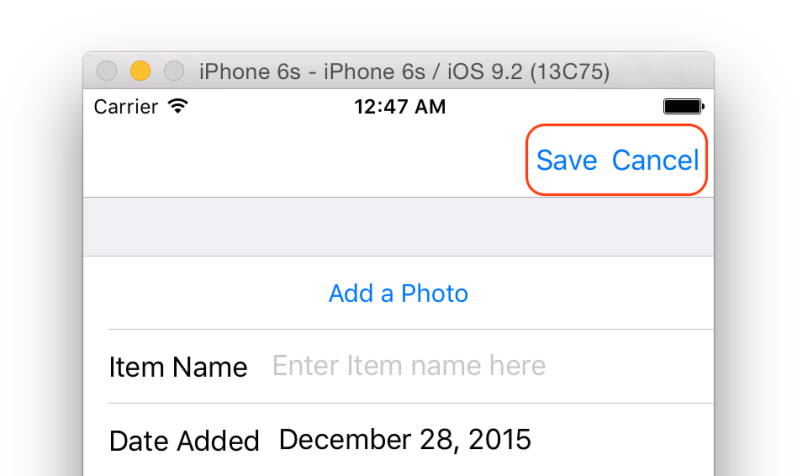
I have a screen in my application which allows the user to add Items to a Pantry , and is presented modally as so:
void OnAdd (object sender, EventArgs e)
{
    Navigation.PushModalAsync (new NavigationPage (new ItemPage ()));
}
I want to have the user explicitly save, or cancel, the information they have entered. I don’t want to use a simple push transition that would show a back button; it’s not the right paradigm for what I’m trying to do. iOS allows this modal choice, as evidenced when adding a new contact:
(Android uses the device ‘back’ button in this instance, but right now I’m just concerned about iOS.)
So, now that I’ve created the transition to my modal screen–an instance of ItemPage–I need to add a couple of ToolbarItems in the ItemPage’s XAML:
<ContentPage.ToolbarItem>
	<ToolbarItem Text="Save" Activated="OnSave" Priority="0" Order="Primary" />
	<ToolbarItem Text="Cancel" Activated="OnCancel" Priority="1" Order="Primary" />
</ContentPage.ToolbarItems>
If I run the app in the iOS simulator I notice that all ToolbarItems render on the right hand side of the navigation bar, and herein lies my problem:
Xamarin.Forms does not let you change the position of the ToolbarItems, but that isn’t enough to stop me me adjusting it. Fortunately, custom renderers save the day!
Creating the ToolbarItem Custom Renderer
I’m not going to use this post to explore creating custom renderers as Xamarin’s documentation already does a great job of explaining how to create and use them. If you are unfamiliar with them, I recommend reading the docs.
Inspired by this forum post, I want to use the Priority value of each ToolbarItem to determine which side of the Navigation Item it will display on. Each item with Priority = 0 will go on the right side of the bar, and each item with Priority = 1 will go on the left side. Here’s the code:
[assembly:ExportRenderer (typeof(FridgeContentPage), typeof(FridgeContentPageRenderer))]
namespace Fridge.iOS
{

    public class FridgeContentPageRenderer : PageRenderer
    {
        public new FridgeContentPage Element {
            get{ return (FridgeContentPage)base.Element; }
        }

    public override void ViewWillAppear (bool animated)
    {
        base.ViewWillAppear (animated);

        var LeftNavList = new List<UIBarButtonItem> ();
        var rightNavList = new List<UIBarButtonItem> ();

        var navigationItem =this.NavigationController.TopViewController.NavigationItem;

        for (var i = 0; i < Element.ToolbarItems.Count; i++) {

            var reorder = (Element.ToolbarItems.Count - 1);
            var ItemPriority = Element.ToolbarItems [reorder - i].Priority;

            if (ItemPriority == 1) {
                UIBarButtonItem LeftNavItems = navigationItem.RightBarButtonItems [i];
                LeftNavList.Add (LeftNavItems);
            } else if (ItemPriority == 0) {
                UIBarButtonItem RightNavItems = navigationItem.RightBarButtonItems [i];
                rightNavList.Add (RightNavItems);
            }
        }

            navigationItem.SetLeftBarButtonItems (LeftNavList.ToArray (), false);
            navigationItem.SetRightBarButtonItems (rightNavList.ToArray (), false);

    }
  }
}
Great…so what’s going on here?
First, I used the attribute, shown below, to tell Xamarin.Forms that we are using a custom renderer. This attribute takes two parameters: the type name of the Xamarin.Forms page being rendered (In our example FridgeContentPage), and the type name of the custom renderer (FridgeContentPageRenderer in this example).
[assembly:ExportRenderer (typeof(FridgeContentPage), typeof(FridgeContentPageRenderer))]
Next, I created two lists to hold my left and right UIBarButtonItems (the native name for ToolBarItems in iOS):
var LeftNavList = new List<UIBarButtonItem> ();
var rightNavList = new List<UIBarButtonItem> ();

I need to have some way to get the items from the right side, and either set them to the left side, or keep them on the right, depending on their Priority. The UINavigationItem in iOS has some properties that will let me get and set these, so I’ll create a variable to capture my navigation item:
var navigationItem = this.NavigationController.TopViewController.NavigationItem;
I then want to go through each of my ToolbarItems and check its priority. If it has Priority = 1, it will be add it to the leftNavList list; if Priority = 0 it’ll be added to the rightNavList. This is achieved through a simple for loop:
for (var i = 0; i < Element.ToolbarItems.Count; i++) {

    ...
    var ItemPriority = Element.ToolbarItems[i].Priority;

    if (ItemPriority == 1) {
        UIBarButtonItem LeftNavItems = navigationItem.RightBarButtonItems [i];
        leftNavList.Add (LeftNavItems);
    } else if (ItemPriority == 0) {
        UIBarButtonItem RightNavItems = navigationItem.RightBarButtonItems [i];
        rightNavList.Add (RightNavItems);
    }
 }
At this point in the code, I have two lists containing left and right items which need to be placed on their respective side of the NavigationItem. As I mentioned earlier, UINavigationItem has properties for this purpose – SetLeftBarButtonItems & SetRightBarButtonItems – which take an array as input. I can use the following lines of code to achieve this:
navigationItem.SetLeftBarButtonItems (leftNavList.ToArray (), false);
 navigationItem.SetRightBarButtonItems (rightNavList.ToArray (), false);
Hooray! We are almost finished… except for one little problem. If I run this in the iOS simulator now, the ToolbarItems won’t be in the expected place. The Save button with Priority = 0 is on the left, the Cancel button with Priority = 1 is on the right:

Why is this happening?
It’s because ToolbarItems (from Xamarin.Forms) stores the items in a reverse order to RightBarButtonItems (from iOS). Therefore the the item (i) referenced in the ItemPriority variable is not the same as the one that we will be assigning to the LeftNavItems and RightNavItems variables. To get around this, I can reverse the order of the ToolbarItems so that the same ToolbarItem corresponds to the same RightBarButtonItem by adding the follow to the start of my for loop:
 var reorder = (Element.ToolbarItems.Count - 1);
 var ItemPriority = Element.ToolbarItems [reorder - i].Priority;
Finally, if we run the application now:

Huzzah! It works as expected.
Of course there are improvements that could be made to this custom renderer; null-checking jumps out as a big one. This is where I encourage you, dear reader, to use my code and make it better!
Happy custom rendering!
Amy

I have no idea what you are articulating about but it was very impressive!! All Hail the GREAT XAMARIN.FORMS!
LikeLike
[…] Creating a Left ToolbarItem in Xamarin.Forms – Amy Burns jumps into Xamarin.Forms and investigates writing a custom renderer for iOS to add left toolbar items […]
LikeLike
[…] Creating a Left ToolbarItem in Xamarin.Forms Amy Burns, from Xamarin Inc., shows us how to get a left bar button on iOS. […]
LikeLike
[…] Click to share on Twitter (Opens in new window) […]
LikeLike
Unfortunately this no longer works as of XF 2.2 as the ContentPage.ToolbarItems collection (line 20) is empty.
LikeLike
Ah! Thanks for that. I haven’t had a chance to revisit this since the latest X.F drop. I’ll fix and update in a bit.
LikeLike
I tested in X.F. 2.3.0.49 and works perfectly. Very easy to understand and apply.
A doubt: you say that in Android devices, the users use hardware button to go back. So, in this case, not is recomended implement custom render for Android to provide left button in this platform?
Thank you for your article, is very helpful!
LikeLike
Thank you very much this is exactly what I was looking for!
LikeLike
I wanted this to work on android too 🙂
LikeLike
After I add a new Page to the NavigationStack and Close it the App will crash?
LikeLike
@Amy
This is by far the easiest solution for me to implement and works well. Thank you for sharing this with the Xamarin community.
Not sure when you last visited this but there is an unusual problem when one pushes a new page from this Modal page using Navigation.PushAsync(myNextPage)
Clicking on the Nav Bar back button labelled ‘myNextPage’ throws an exception error
‘Index was outside the bounds of the array’
Is the CustomRenderer somehow interfering with the default back button on he left of the Nav Bar?
LikeLike
For anyone else who may stumble across this blog page. The defect that exists in this renderer is that it assumes there are always two RightBarButtonItems. However if you ‘Navigation.Push’ or ‘Navigation.PushModal’ another Page onto the Stack and then navigate back, the Custom Renderer is called again and crashes. This is because you have already moved the ‘Cancel’ button to the left when the Page was first created.
The simplest method (&quickest) method for me was to add a line after
var navigationItem =this.NavigationController.TopViewController.NavigationItem;which will exit the Renderer if only one RightBarButton item exists
if (navigationItem.RightBarButtonItems.Length < 2)return;
LikeLike
it’s work but the menu doesn’t appear now
LikeLike
[…] Last night, while working through an app I am making I had to fight with this shortcoming and I think it makes sense to detail the approach I came to, based heavily on https://timeyoutake.it/2016/01/02/creating-a-left-toolbaritem-in-xamarin-forms/ […]
LikeLike
Vow.. Great article..Not just about the toolbaritems…a great way to demonstrate how the Custom Renderer works… Thank you,,
LikeLike
please help..
1. my dashboard already have 2 toolbar item.
2. I need to redirect to another page (using INavigatedAware). After i click back, the apps will crash.
3. The error said “Index was outside the bounds of the array.”
please help. thanks
LikeLike
NavigationController is always throwing null reference exception. How can i solve this issue?
LikeLike
Hi i want to remove space infront of left item(Cancel) and back side of right item(Save),i am working with xamarin.forms ,could you please help me on this ,thanks in advance.
LikeLike
Wonderful! Thank you so much for this!
LikeLike
Trying to find powerful online promotion that isn’t full of crap? I apologize for sending you this message on your contact form but actually that’s exactly where I wanted to make my point. We can send your promotional copy to sites through their contact pages just like you’re reading this ad right now. You can specify targets by keyword or just fire off bulk blasts to sites in any country you choose. So let’s assume you need to push through a message to all the plumbing companies in the US, we’ll scrape websites for just those and post your ad text to them. As long as you’re promoting a product or service that’s relevant to that business category then you’ll receive awesome results!
Type up a quick note to sarah1916eva@gmail.com for the details
LikeLike
Trying to find effective advertising that isn’t completely full of it? I apologize for sending you this message on your contact form but actually that was kinda the point. We can send your advertising text to websites via their contact pages just like you’re receiving this note right now. You can target by keyword or just execute mass blasts to sites in the location of your choice. So let’s assume you want to push through a message to all the real estate agents in the United States, we’ll scrape websites for only those and post your ad text to them. Providing you’re advertising some kind of offer that’s relevant to that type of business then your business will get an amazing response!
Shoot an email to muhammad2435tay@gmail.com for details on how this works
LikeLike
Are you seeking powerful online promotion that has no per click costs and will get you new customers fast? Sorry to bug you on your contact form but actually that’s exactly where I wanted to make my point. We can send your ad message to websites via their contact pages just like you’re reading this message right now. You can target by keyword or just do bulk blasts to sites in the country of your choice. So let’s assume you want to blast an ad to all the web developers in the US, we’ll grab websites for only those and post your advertisement to them. Providing you’re promoting something that’s relevant to that niche then your business will get an amazing response!
Write a quickie email to poppy8542bro@gmail.com to find out how we do this
LikeLike
great issues altogether, you just won a logo new
reader. What would you recommend in regards to your put up that you made some days in the past?
Any certain?
LikeLike
Hi, I was just on your website and filled out your contact form. The contact page on your site sends you these messages via email which is the reason you’re reading through my message at this moment correct? That’s the most important achievement with any type of online ad, getting people to actually READ your message and that’s exactly what I just accomplished with you! If you have an advertisement you would like to blast out to thousands of websites via their contact forms in the U.S. or anywhere in the world let me know, I can even target specific niches and my costs are very affordable. Reply here: Benja57mik57@gmail.com
LikeLike